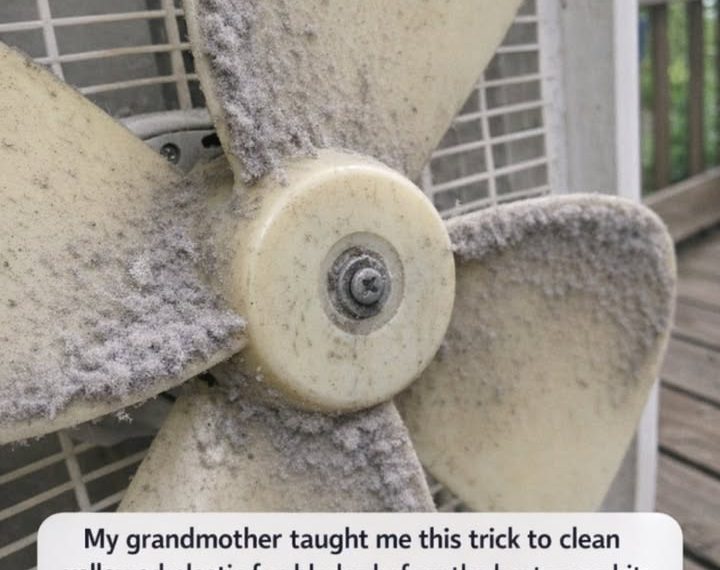
Every year, right before the first real stretch of 90-degree weather, I start pulling fans out of closets, the basement shelf, and that one corner of the laundry room where appliances seem to collect. And every year, at least one of them has those dingy, yellowed plastic blades that make the whole fan look older and dirtier than it really is. My grandmother showed me a simple way to deal with that years ago, and I still use it because it saves scrubbing, saves time, and honestly feels a little like magic.
This is not one of those fussy cleaning methods that needs six specialty products and an afternoon of elbow grease. It is a low-effort soak-and-wipe approach for removable plastic fan blades, using warm water, dish soap, and hydrogen peroxide or oxygen bleach to lift built-up grime and brighten yellowed plastic. I’ll walk you through exactly how I do it, what kind of yellowing this trick helps most, what to avoid, and how to get your fan ready before the heat wave hits.
1. Why plastic fan blades turn yellow in the first place
A lot of folks assume yellow plastic means the fan is ruined, but that is not always true. In my experience, fan blades usually turn yellow from a combination of kitchen grease, dust, nicotine exposure, sunlight, and plain old oxidation. If the fan has sat near a stove, in a garage, or in a sunny window for 2 to 5 summers, the plastic can pick up a yellow cast even if it still works perfectly.
There are really two different problems that look similar. One is surface grime, which feels tacky or dull and usually comes off with soaking. The other is deeper discoloration inside the plastic itself from age or UV exposure. My grandmother’s trick helps a lot with the first kind and can noticeably improve the second, but it may not return every blade to bright factory-white. I think it is still worth doing because even a 50% improvement makes a fan look much cleaner.
2. The “0 effort” trick my grandmother used
Her method was simple: take the fan apart just enough to remove the blades, soak the blades in a brightening bath, then wipe them clean with almost no scrubbing. For white or off-white plastic, she liked a mix of warm water, a squirt of dish soap, and hydrogen peroxide. On especially dingy blades, she would set the soaking tub near a sunny window for 1 to 3 hours, because gentle warmth and light seemed to help the whitening along.
What I love about this method is that the soaking does the heavy lifting. Instead of rubbing each blade for 15 minutes and pushing dust around with a rag, you let the solution soften grease, loosen dirt, and brighten the plastic while you do something else. As a busy parent, that is exactly my kind of cleaning job.
3. What you need before you start
Here is what I gather on the kitchen counter before I begin: a screwdriver, a soft microfiber cloth, an old toothbrush, dish soap, 3% hydrogen peroxide or oxygen bleach, a large tub or sink, and a dry towel. If the blades are especially greasy, I also keep 1 tablespoon of baking soda nearby, but I use it sparingly.
For one standard box fan or pedestal fan blade set, I usually fill a sink or plastic storage tub with about 1 to 2 gallons of warm water. Then I add 1 teaspoon to 1 tablespoon of dish soap, depending on how dirty the blades are, plus 1 to 2 cups of 3% hydrogen peroxide. If I’m using oxygen bleach instead, I dissolve about 1 to 2 tablespoons in warm water according to the label directions. I do not mix peroxide with vinegar, ammonia, or chlorine bleach.
4. Make sure your fan is the kind that can be cleaned this way
This trick is best for fans with removable plastic blades, like many pedestal fans, table fans, and some window fans. If the blade assembly pops off after removing the front grill and center cap, you are usually in good shape. I always unplug the fan first and leave it unplugged the whole time.
For box fans, things can be a little more awkward because the blade may be harder to remove. If the plastic frame comes apart easily and the blade can be taken out without forcing it, go ahead. If not, I clean it in place with the same solution on cloths instead of soaking the entire motor section. Never soak anything with wiring, switches, or the motor housing attached.
5. Take the fan apart safely in 5 to 10 minutes
Most household fans come apart with a Phillips-head screwdriver and a little patience. I remove the front grill, set the screws in a cereal bowl so they do not wander off, and gently twist off the blade cap or center fastener. Some fans loosen clockwise and others counterclockwise, so I never force it if it resists.
Once the blade is off, I dust it lightly over a trash can or outside on the porch. This keeps the soaking water from turning muddy right away. If there are thick lint clumps around the center hub, I brush those off first with a dry toothbrush.
6. The soaking formula I use for yellowed blades
For average yellowing, I fill a tub with enough warm water to fully cover the blades, usually 1 1/2 gallons. Then I add 2 teaspoons of grease-cutting dish soap and 1 cup of 3% hydrogen peroxide. I swirl the water with my hand to combine it, then lay the blades in flat.
For blades that are very dingy or have sticky residue, I bump the peroxide up to 2 cups per 1 1/2 to 2 gallons of water. If I’m out of peroxide, I use oxygen bleach instead, usually 1 tablespoon per gallon of warm water. I let the blades soak for at least 30 minutes and up to 2 hours. If I see improvement but not enough, I refresh the solution and repeat once more.
7. How long to soak for the best result
Light dirt and kitchen film often loosen in 20 to 30 minutes. Moderate yellowing usually needs 45 to 60 minutes. The worst blades I ever tackled, from an old fan that had sat in my husband’s workshop for years, needed two separate 90-minute soaks.
I do not recommend leaving the blades in solution all day just because it feels easier. Plastic can dry out or become dull if overexposed to cleaners. I check every 30 minutes, lift one blade edge, and wipe a small spot with a cloth. If the cloth comes away gray or yellow and the blade looks brighter, it is working.
8. The almost-no-scrub wipe-down step
After soaking, I place the blades on a folded towel and wipe each one with a soft microfiber cloth. Usually, the grime slides right off. Around the blade edges and near the center hub, I use an old toothbrush with very light pressure. This is maybe 2 or 3 minutes of actual hands-on work for the whole blade set.
If there is still a stubborn yellow patch, I make a quick paste with 1 tablespoon baking soda and a few drops of water, then rub only that area gently for 15 to 20 seconds. I do not use rough scrub pads, steel wool, or magic-eraser-style abrasives on glossy plastic because they can leave the blades hazy.
9. When sunlight helps, and when I skip it
My grandmother liked to set the soaking tub where it would catch gentle morning sun for an hour or two. I still do that sometimes for white fan blades, and I do think it helps brighten them a bit more. If I use a clear storage bin, I cover it loosely with a white towel to keep leaves and bugs out if it’s outside on the patio.
That said, I avoid blazing afternoon heat. I do not leave the blades baking in direct 95-degree sun for half a day. Warmth is fine; cooking the plastic is not. If it is already hot outside, a bright laundry room or sunroom window works better.
10. What this trick will and will not fix
This method is excellent for removing surface yellowing from grease, smoke residue, dust buildup, and storage grime. It can also improve age-related yellowing enough that the fan looks fresher and cleaner from across the room. On older off-white plastic, I often see a difference of one to two shades after a single treatment.
What it will not do is repair brittle plastic, cracks, melted spots, or very deep UV damage. If the blade has hairline fractures, warping, or chalky plastic that flakes when touched, I stop there and replace the fan. A wobbly blade is not something I take chances with in a home full of kids, pets, and busy feet.
11. Clean the grill and fan body while the blades soak
Since the blades are doing their thing in the tub, I use that time to tackle the grill. I fill a bowl with 4 cups of warm water and 1 teaspoon of dish soap, then wipe down both the front and rear grill with a cloth. For dusty corners, I use a small cleaning brush or toothbrush.
The motor housing only gets a barely damp cloth, never a soaking wet one. If dust is packed into vents, I use a vacuum brush attachment or canned air outdoors. This whole extra step adds maybe 10 minutes, but it makes the fan blow cleaner air and look much better when reassembled.
12. Rinse and dry the blades the right way
Once the blades are clean, I rinse them under cool or lukewarm water until there is no slippery soap feel left. Then I dry them with a towel and let them air-dry standing upright on a dish rack or laid flat on a dry towel for another 30 to 60 minutes.
This part matters more than people think. If moisture sits in the center hub and you reattach the blade too soon, it can trap water where you do not want it. I always make sure the blades are fully dry before putting the fan back together.
13. Reassemble and test for wobble
When everything is dry, I slide the blade back on exactly as it came off, tighten the cap snugly, and reinstall the grill. I do not overtighten plastic parts because they can crack. Before plugging the fan in, I spin the blade gently by hand to make sure nothing rubs.
Then I test the fan on its lowest speed first. If it rattles, wobbles, or sounds uneven, I unplug it and check whether the blade is seated correctly. A clean fan should run smoothly, and you will usually notice the airflow feels stronger simply because the dust is gone.
14. My favorite ways to keep blades from yellowing again
Once the fan is clean, a little maintenance goes a long way. I wipe the grill every 2 weeks during heavy summer use, and once a month I unplug the fan and wipe the blades if I can reach them safely. In the kitchen, where grease travels farther than people think, I do it every 10 to 14 days.
At the end of summer, I clean the fan before storing it, then cover it with a pillowcase or a large trash bag with a few holes for airflow. That simple habit keeps dust from settling all winter. If a fan sits near a sunny window, I move it back a foot or two when possible to reduce UV yellowing.
15. A few easy variations for different households
If someone in your house is sensitive to scents, use a fragrance-free dish soap. If you are cleaning in a small apartment without a big sink, a 16-quart storage bin works nicely for most pedestal fan blades. If your fan is small, even a clean bathtub can work in a pinch, though I put down a towel first to prevent scratches.
For especially busy families, I suggest making this a “set it and forget it” chore: start the soak after breakfast, wipe the blades down while lunch is cooking, and reassemble in the afternoon. It is the kind of job that fits around real life, which is exactly why I still hear my grandmother’s voice in my head every June telling me, “Let the water do the work.”
16. The bottom line before the heat wave arrives
If you have a fan with yellowed plastic blades, do not assume you need to replace it before summer. In many cases, a 30- to 60-minute soak in warm water, dish soap, and hydrogen peroxide is enough to loosen grime and brighten the plastic with very little effort. That is the whole beauty of this old trick: it is simple, affordable, and uses things many of us already have at home.
I try to do this before the first forecast with three straight hot days, because once that heat settles in, every clean working fan in the house suddenly matters. And there is something satisfying about setting up a fan that looks fresh, runs smoothly, and is ready to keep the family comfortable. Sometimes Grandma really did know the easiest way.